Collaboration
Podcast editing: how to edit a podcast like a pro
Last updated 22 May, 2026
13 mins

You just nailed your podcast recording. Now you’re waiting for a huge audio file to download.
Not the creative rush you were hoping for.
Without a clear podcast editing workflow, podcast post-production can quickly go from creative endeavor to a frustrating time-suck.
From background noise and awkward pauses to clunky transitions and endless re-exports, editing a podcast can feel overwhelming — especially if you’re not sure where to start.
But mastering your edit is just as important as hitting “record.”
In this guide, we’ll walk you through the podcast editing process step by step — so you can cut the friction, polish your sound and get back to growing your audience.
Podcast post-production: going from raw recording to listener-ready
Unless you’re watching a live show, raw recordings are rarely ready for prime time.
Everyone edits. Then edits again. And you should, too.
Great editing can take a podcast from amateur hour to professional polish. It’s where you add structure, shape and personality, turning a rough recording into something people actually want to listen to.
Sure, you could hire a pro editor. But you shouldn’t. At least not to begin with.
Why you should try editing your own podcast
Editing your own podcast first will teach you so much.
You’ll spot the creative hiccups and technical glitches you didn’t notice before, learn how to fix them and how to avoid them next time.
And, you'll find your voice and sharpen your show’s focus. Discovering which moments really worked and what your most engaging opening hook may be.
So it’s worth investing a bit of time (and maybe some money) in the right tools and techniques.
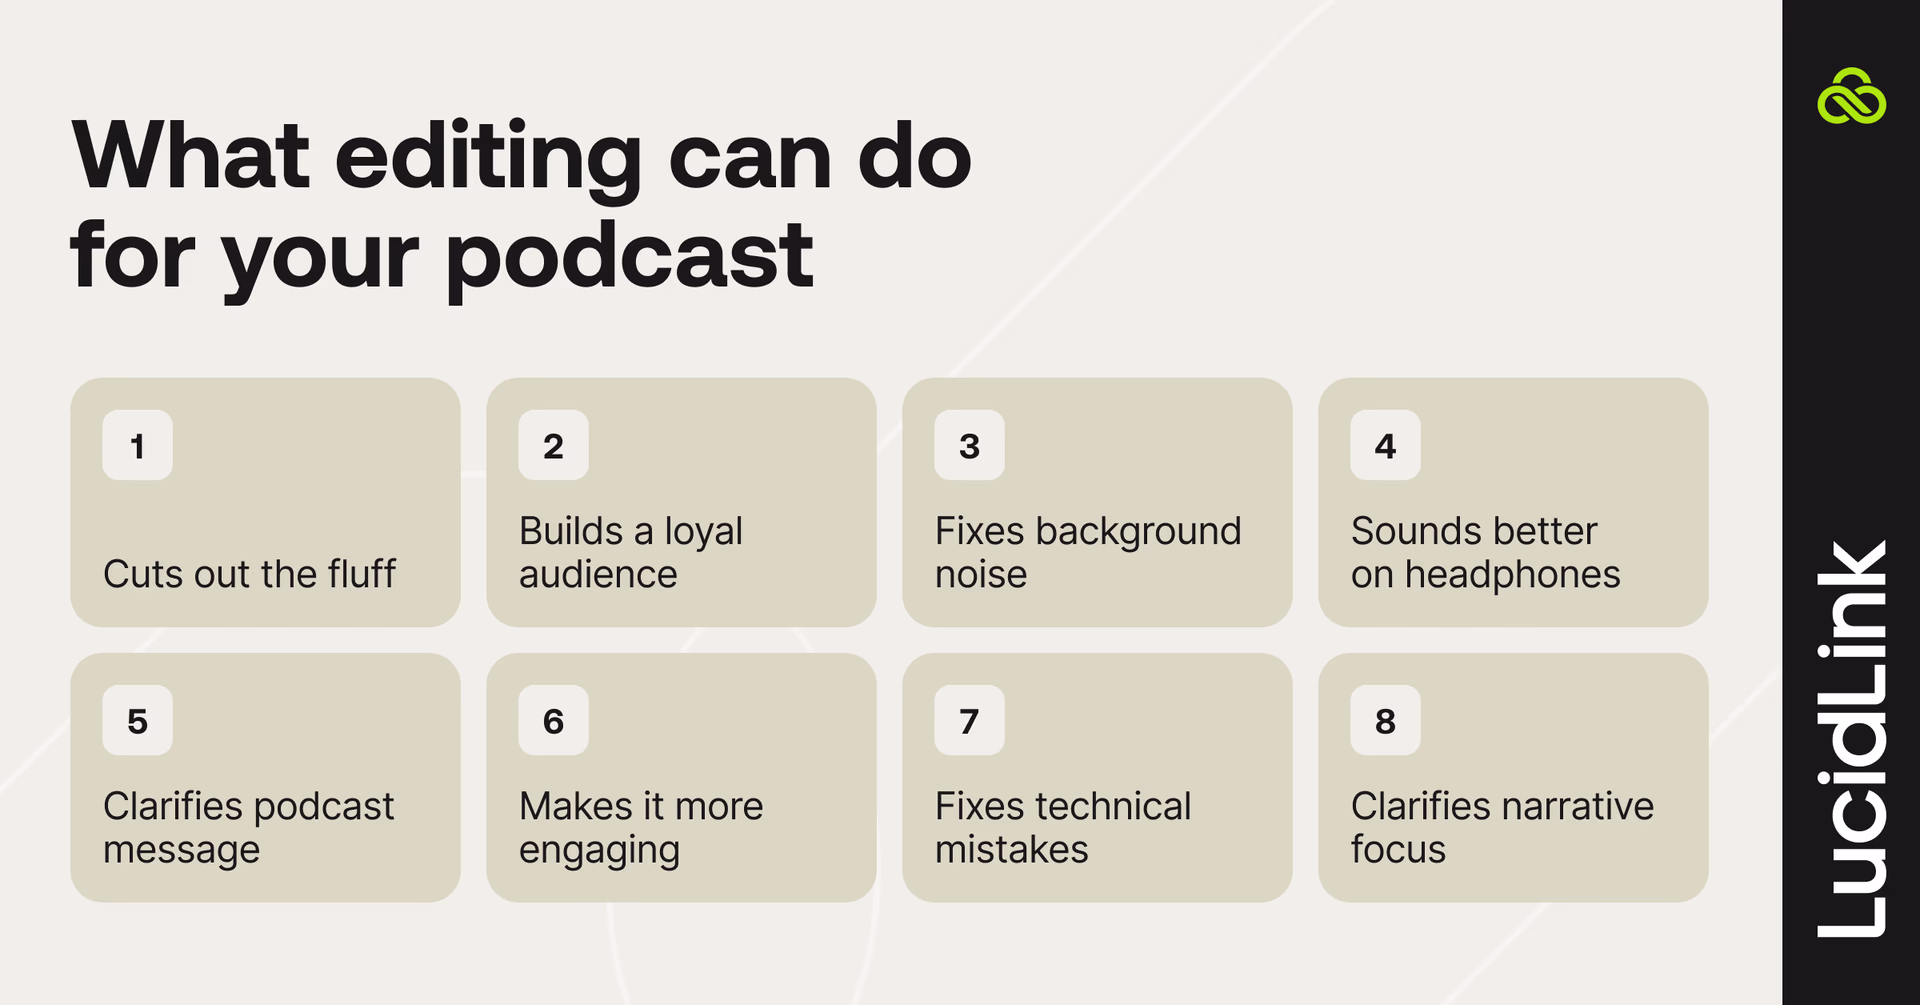
Here’s what podcast editing can do for you:
Cut out the fluff and keep your episodes tight and engaging
Build a loyal audience that wants to come back
Fix background noise, volume jumps and other tech headaches
Make your podcast sound great across all devices — headphones, car speakers or home setups
Clarify what your podcast is really about, helping you grow in a specific niche rather than trying to please everyone.
Common podcast editing challenges
Podcast editing sounds simple. Just cut out the “ums” and upload, right?
Not quite.
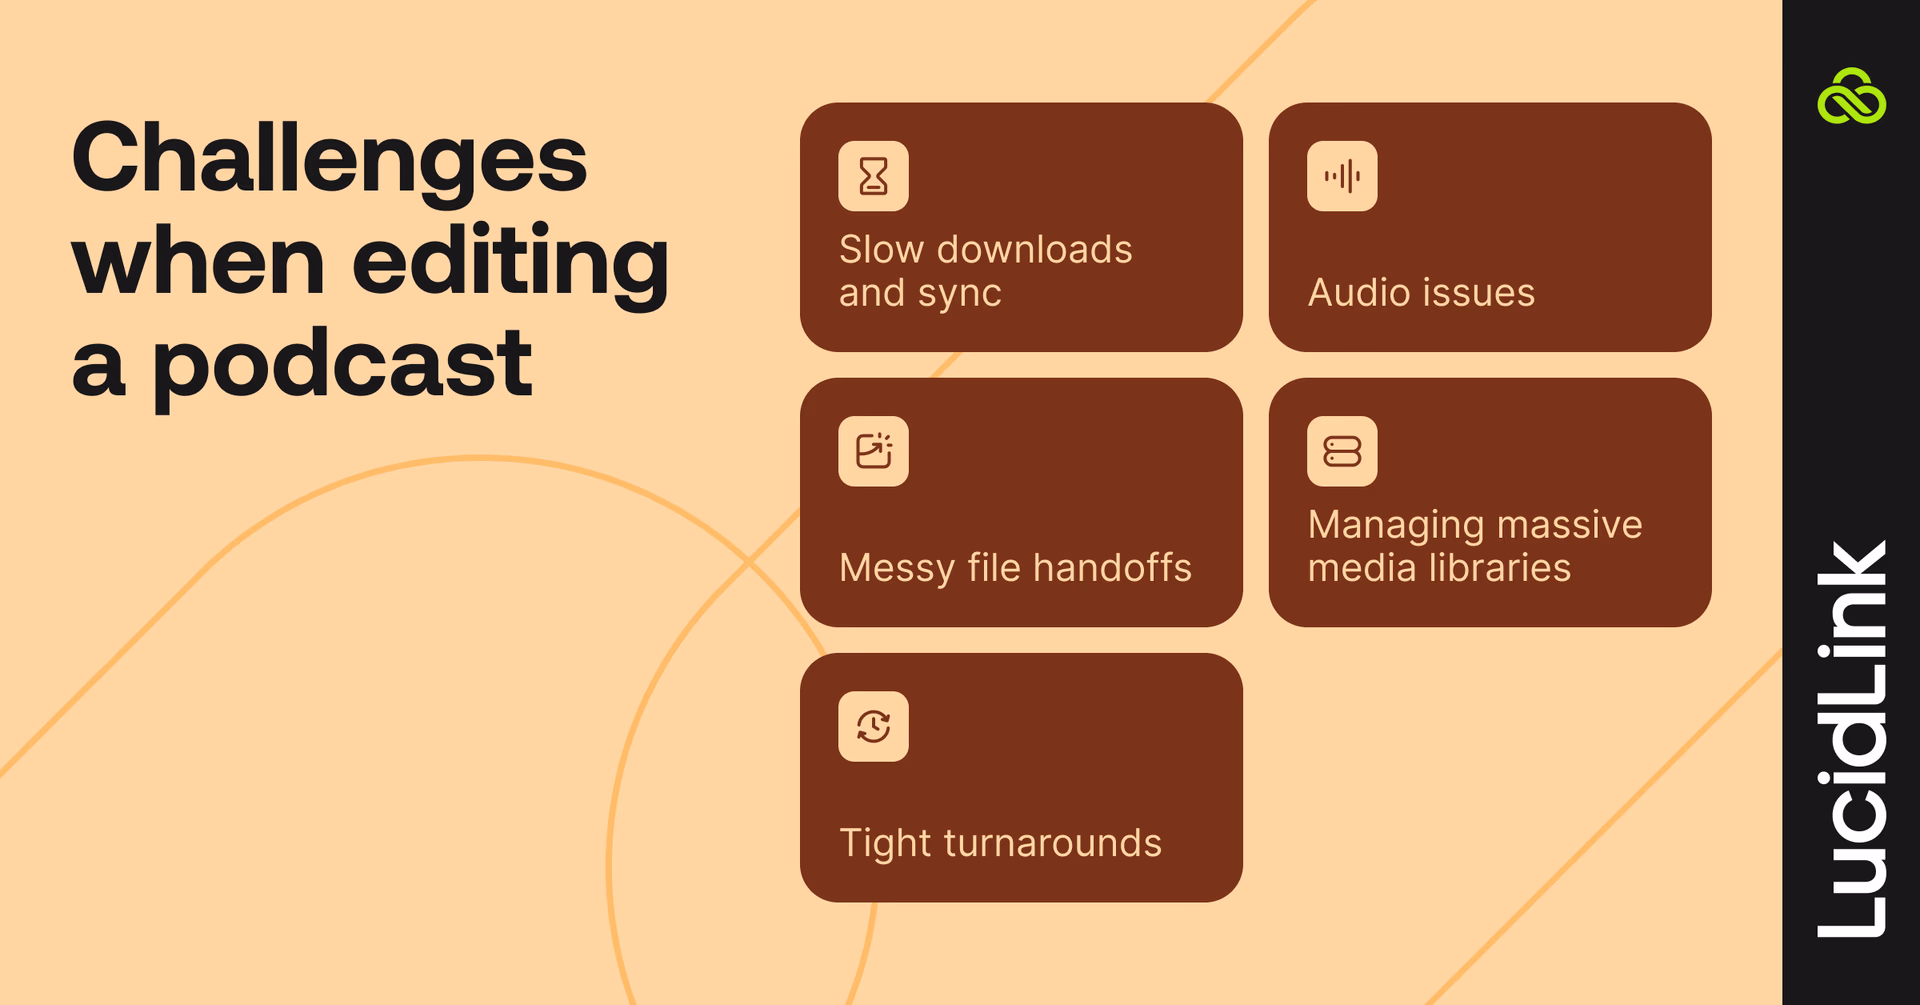
Whether you are producing a friendly chat or highly crafted docuseries, even experienced editors run into the same frustrating snags:
Audio issues from remote guests or noisy recording spaces
Messy file handoffs between hosts, editors and producers
Slow downloads and sync errors that derail revisions
Managing massive media libraries with interview, b-roll and VO
Tight turnarounds that leave no room for mistakes
It’s easy to blame your podcast editing software. But most of these issues usually come down to your workflow and how your team is actually working together.
A lot of teams are starting to rethink that part. Instead of constantly downloading, uploading and passing files around, they’re using tools like LucidLink to work from the same files in the cloud. So editors, producers and hosts can all access what they need right away, without the usual sync headaches or version mix-ups.
This video explores more of the challenges of designing a scalable podcast workflow (as well as giving you some solutions).
But don’t sweat it, we’ll also walk through more podcast editing tips below.
How long does it take to edit a podcast?
The more you edit a podcast, the faster your podcast editing will be.
But how long should you expect it to take in the beginning?
No two podcasts are exactly alike — but here are some general benchmarks to help you plan:
Light editing for short solo show: 2–3x runtime
Heavily edited interview: 4–6x runtime or more
Documentary production: 8–10x runtime
So, for example, a final 30-minute interview podcast between two speakers might take a couple of hours to edit down from a 45–60 minute source recording.
Why podcast editing times vary
Yet, even with the same podcast format each time, individual episodes may take longer to edit than others.
This is because the time it takes to edit a particular podcast episode will depend on:
The number of speakers
The length of the source recordings
Delivery quality and coherence from speakers
The inherent structure of the conversation (or not)
The recording quality of the original files
Complexity and number of music cues or sound design
Workflow friction (especially for file access, tool speed and feedback loops)
Turning a chaotic interview with bad audio and a messy asset folder into a polished podcast? That’ll take time — but it’s fixable. We promise.
7 essential steps of podcast editing
Here’s how to edit your podcast to perfection in 7 simple steps.
Step 1: record your podcast
Choose a quiet space (a studio’s even better), prep your questions, ditch the noisy notes and grab a glass of water.
Keep the mic about 6 inches (30 cm) away, angled at 45 degrees to avoid plosives (pops on P and T sounds on your recording)
Record your podcast as 24-bit 48 Hz wav files
Record a separate audio track per speaker
If recording remotely, use a platform like Riverside.fm or Streamyard
Step 2: prep your files
Download your audio recordings and store them on a fast local hard drive (or skip all that and collaborate in real-time with LucidLink).
Taking the time to get organized now, will save you a lot of time and stress later.
Organize your media
Use logically consistent file names (e.g. Podmania_S3_Ep27_Guest_170625_Take 1.wav)
Adopt a coherent folder structure (e.g. Podmania > Series 3 > Episodes 27 > Media | Music | Sponsors | Titles | SFX | etc.)
Back up your media, project files and exports (Follow the 3-2-1 rule)
Set up your edit
Sync multi-track recordings into one timeline to edit the show in sync
Import music, SFX libraries and sponsor ads
Tip: a messy media library is just one of workflow bottlenecks draining your time and killing your creative flow.
Step 3: clean up the audio
A clean studio recording is a great start, but a little editing can take the voices to the next level.
If you have to record under less-than-ideal circumstances, your audio quality can often be rescued, thanks to a few filters and some AI.
Remove background noise and hums with EQ or in-app filters
Apply EQ to remove unnecessary low-end rumble and high-end sibilance
Add a little compression to keep the audio levels consistent
Normalize volume levels across speakers for a smooth listening experience
Tip: think audio post-production is only for engineers? Think again. You can get great results without a degree in sound design.
Open Adobe Podcast Enhance and upload your original recordings (or if you’re on the free plan, your final edit). This will use AI to remove background noise and enhance the speech quality, making poor recordings sound studio calibre.
The free plan is limited to:
500MB uploads
30 minute file durations
1 hour of processed audio per day
No strength adjustment of the audio processing
If you already have Adobe Creative Cloud, you have access to the Pro Plan thrown in, which allows for bulk uploads, 1GB file limits, 4 hours of processing and 2 hour long recordings.
You can also adjust the processing strength. Go as low as you can while still cleaning up your audio.
Optionally explore similar tools like Riverside Magic Audio or Descript Studio Sound - there are lots of AI audio clean-up tools to choose from.
Step 4: cut the fluff
This is the big one — where you shape your story, cut the fluff and make sure the right voices come through, in the right order.
Trim the excess
Trim long silences, remove filler words (um, ah, like, you know) and off-topic detours into conversational dead ends
Keep it natural
Avoid over-editing. Leave in breaths, emotional pauses and human elements that make the conversation relatable. Remove duplication, re-statements and circular thoughts.
Check the pacing
Ensure your podcast flows well. Leave room for content to breathe, keep the energy consistent and start with something that hooks your audience.
Optional: jot down key edit points or timestamps — especially if you’re prepping a brief or “paper edit” for your editor.
Step 5: add polish
Now that you’ve got the structure of your podcast nailed down it is time to make it shine.
Insert intro/outro music, transitions, SFX and sponsor breaks
Double-check audio levels are consistent across your edit and these ‘set pieces’.
Fade in/out cleanly between sections
Don’t leave in abrupt audio jumps or pops
Step 6: mix and master
This step is the last technical hurdle to cross before exporting your final file.
Attend to final leveling, compression and loudness matching (aim for -20 to -16 LUFS)
Export in standard podcast format (e.g. MP3 at 128kbps 44.1 kHz mono)
Most podcast platforms have file upload limits, but AAC is a higher-quality option
Tip: think like your listeners: test your mix on headphones, in the car and even through your laptop speakers. If it holds up in every environment, you're good to go.
Step 7: review and revise
This is the final chance to make any last-minute adjustments. At least before you share it with your collaborators for review.
Do a full listen or skim through, cross-checking against any feedback notes
Share a draft with collaborators if needed
Read our in-depth guide on sending large audio files for review.
Common podcast editing mistakes (and how to avoid them)
You’ve tackled the edit — nice work.
But are you sure it’s smooth sailing?
Keep an eye out for these common slip-ups and turn your good edit into a great one.
Over-processing: a little goes a long way. Adding too much (AI) noise reduction or compression will distort your original recordings and leave you with robotic/crunchy voices.
Inconsistent volume: if the volume level of your podcast jumps up and down, you will annoy your listeners.
Choppy edits: bad editing sticks out. Avoid cutting too close to breaths or trimming too tightly to the previous or next word.
Skipping transitions: no fades = jarring jumps. Make the entrance or exit of new sounds a smooth experience.
Ignoring LUFS: some podcast platforms QC for loudness. If there’s a loudness mismatch between your recording and the platform your audience will have a poor playback experience.
Disorganized assets: adds unnecessary friction to creativity, feedback and publishing.
Best podcast editing software and tools
What is the best podcast editing software or services for both beginners and pros alike?
Here’s a quick rundown of some of the most popular podcast editing tools:
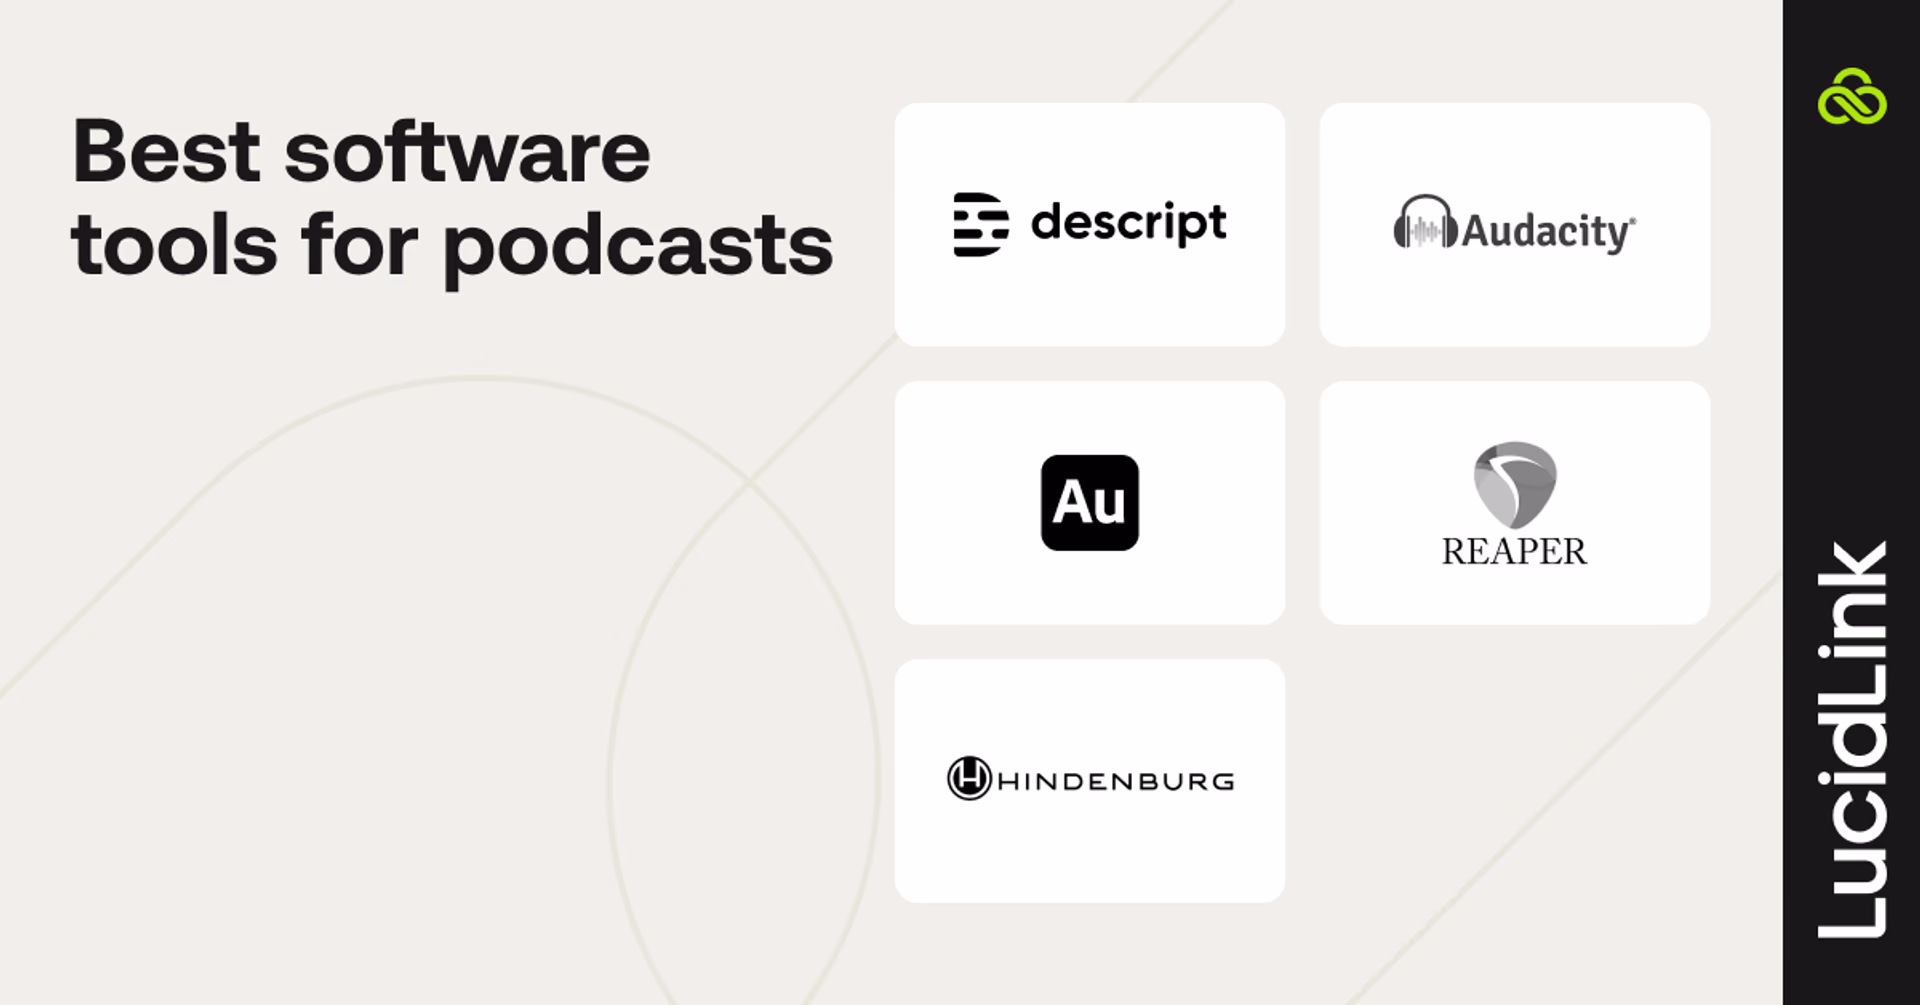
Descript: best for beginners (AI-powered transcript editing)
“Edit audio like you’re editing a text document.” That’s the promise of Descript’s browser-based podcast editor. You can record, transcribe, edit and polish in one place.
If you’re using Descript as your main editor, you’ll need to upload your media first — and depending on how big your files are, that might take a bit.
The upside? Since it’s cloud-based, working with others is a breeze. Descript even has built-in commenting, so getting feedback and sign-off is super simple.
The AI-powered all-in-one service is ideal for beginners with text-based editing and built-in fixes, such as:
Audio quality fixing and polishing
Silence and filler word removal
Replace dialogue with AI text-to-speech
Social media clip selection
Show notes and chapter lists
Eye contact fixing (for video)
Background removal and replacement (for video)
You can publish your final edit directly from Descript to your favourite podcast publishing platform.
Start with a free trial or the lowest paid tier is $16/month.
Adobe Audition: pro-grade DAW for audio editing
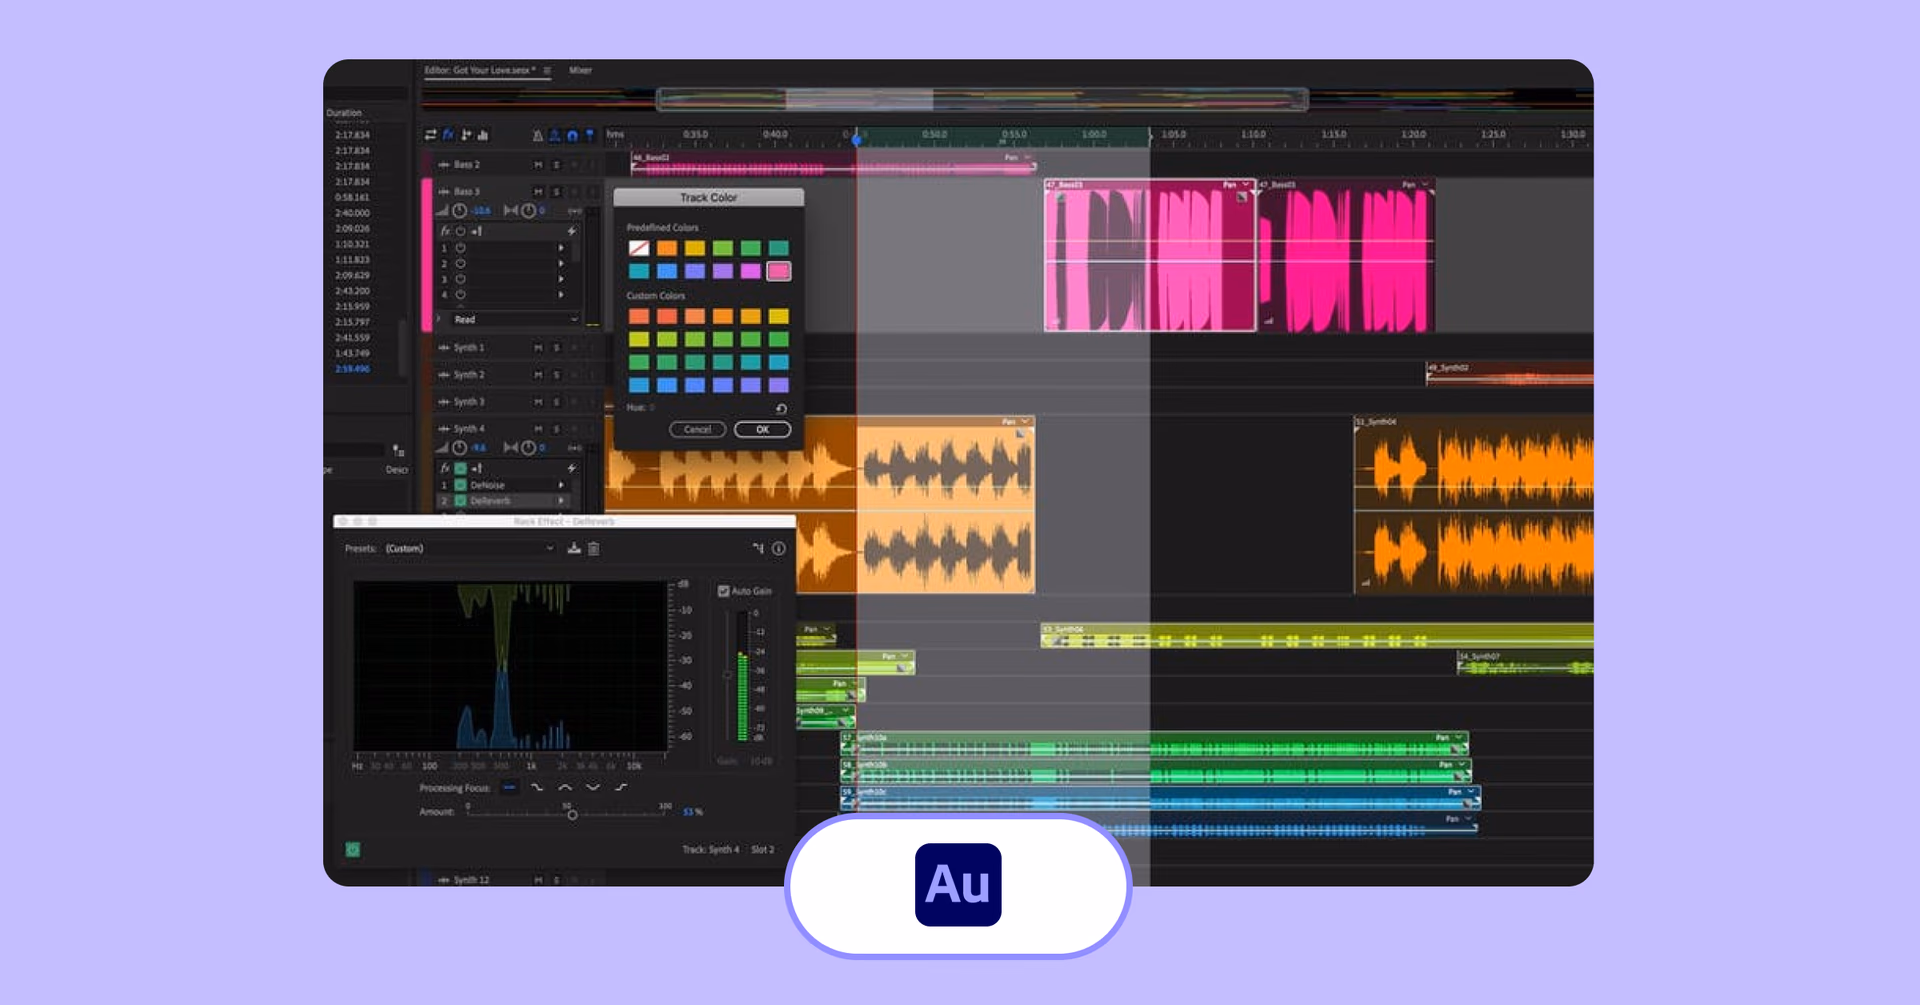
If you prefer to have more nuanced hands-on control of your podcast edit, then using a professional DAW (Digital Audio Workstation) will give you the best results.
Audition is a powerful desktop app that doesn’t require you to upload any of your media and has a full suite of complex filters, plugins and tools to help you craft your edit.
Useful features for podcast editors include:
Silence removal
Enhance speech with AI
Waveform and frequency spectrum displays
Loudness meters
Surround sound editing
The learning curve for using a DAW like Audition is much steeper than using an online tool like Descript or Riverside, but what you trade in simplicity, you’ll gain in technical capability.
As it is a ‘single-player’ desktop app, collaborating with others, such as for review and approval, will require using an online platform to host your work.
Start with a free trial or subscribe to a single app for $22.99/month (annual contract, billed monthly).
Audacity: free and simple, useful for quick edits
Audacity is one of the go-to free tools for podcast editors who want to skip the subscriptions. It’s an open-source desktop app, packed with editing features and plugins, and works on Mac, Windows and Linux. It’s been around for 25 years, so there’s a huge community of users you can lean on for tips, support and tutorials.
Audacity is an ideal pick for anyone looking to do quick, simple edits for free.
Features include:
Recording tools
Noise reduction
Native EQ, pitch and reverb effects
Hundreds of third-party VST plugins available
File format conversion
If you want to collaborate with other creatives on your podcast edit you can use Audio.com, which is a cloud-storage platform designed for Audacity users and workflows.
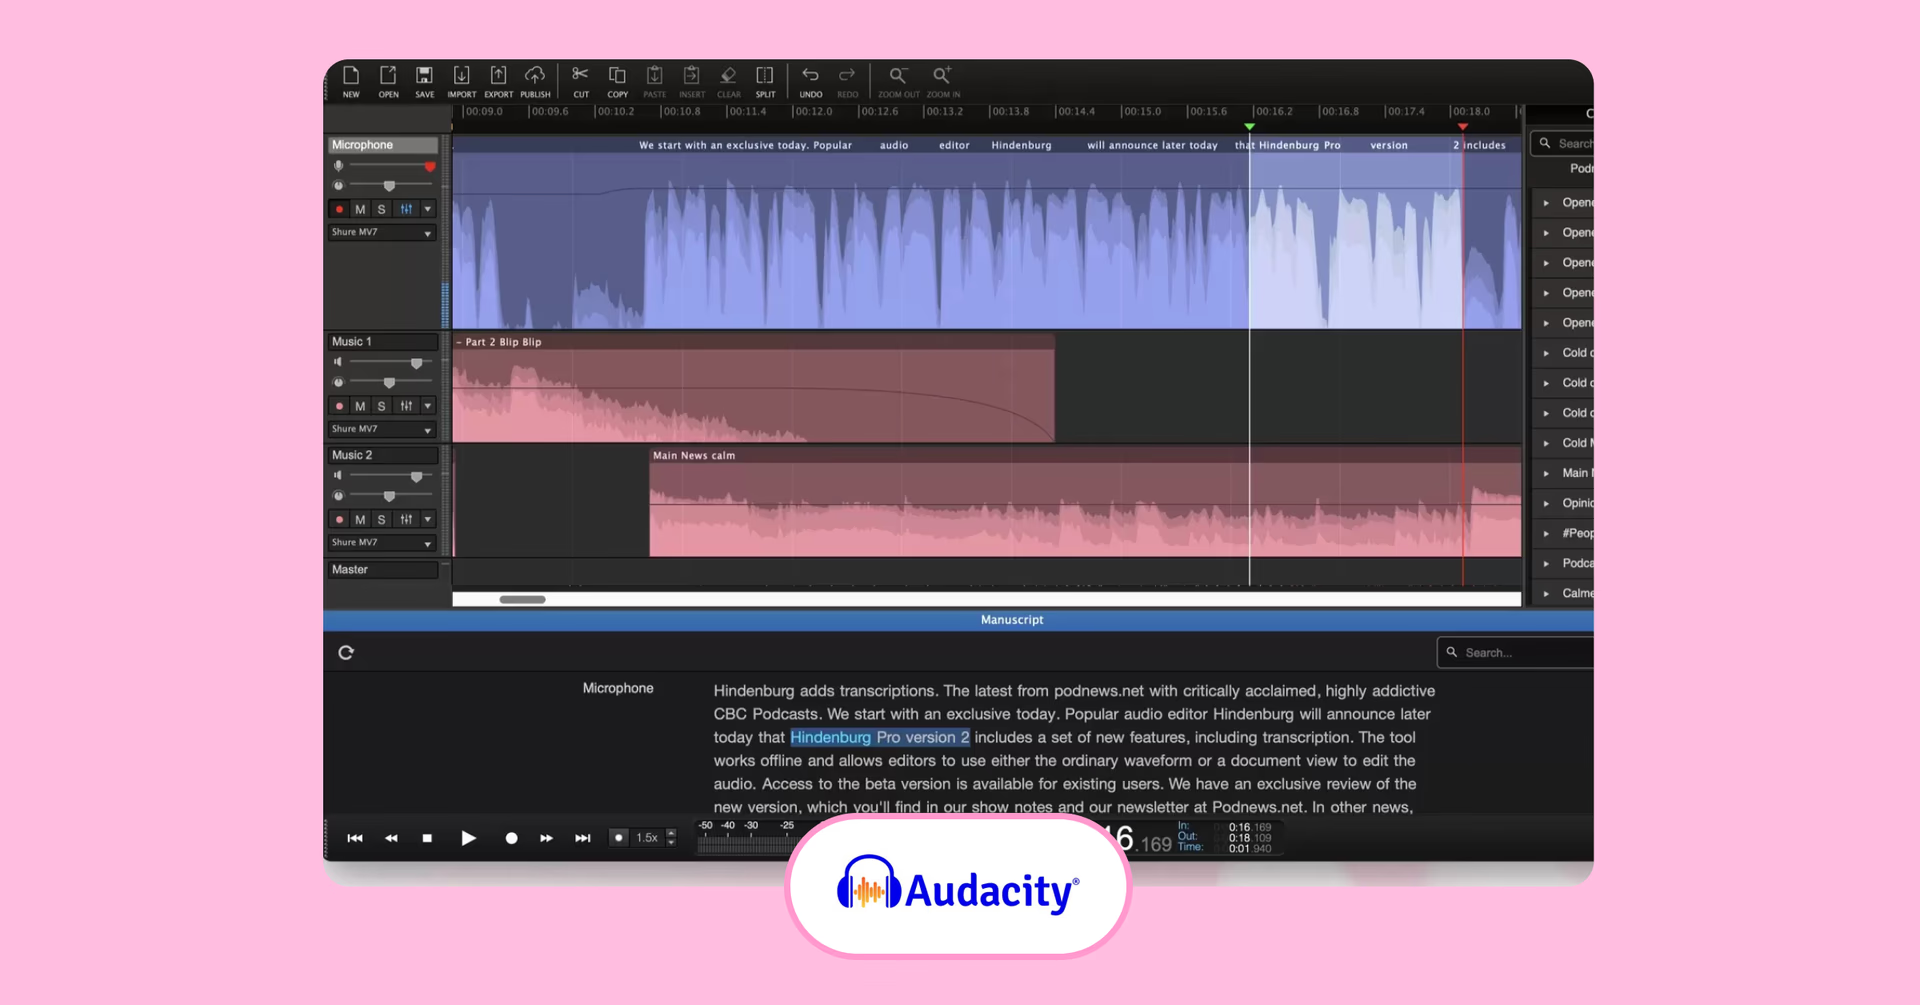
Hindenburg: built for journalists and spoken word workflows

Built for journalists, podcasters and creators working with spoken word content (e.g. audiobooks and voice overs), Hindenburg Pro is an intuitive and streamlined desktop DAW.
If you’re creating a long-form documentary-style podcast then Hindenburg is well worth considering.
Core features include:
Automated microphone settings
Magic levels - balance multi-track audio and eliminate microphone bleed
Background noise reduction
Voice Profiles for consistent sounds across projects
Offline transcription and text-based editing in 99 languages
Complex ‘clipboards’ for easy editing
Loudness normalisation and export reports
One of the things Hidenburg prides itself on is delivering technical features in a non-technical manner, making it easy for anyone to get started and yet deliver professional results. They even have an iOS field recording app to make it easy to capture your stories wherever you are.
Start with a free trial. The Hindenburg Pro Plus plan is $12/month and includes 20 hours of audio transcription.
They also offer discounts for non-profits and worthy causes.
Reaper: affordable, customizable DAW for advanced users

Another powerful desktop DAW, Reaper was originally designed with music production in mind. It offers a complex “multitrack audio and MIDI recording, editing, processing, mixing and mastering toolset.”
Supported on Windows, Mac and Linux it works with a wide range of third-party plugins and scripting functionality, which is why so many technically competent audio engineers love it.
This means it isn’t an obvious choice for anyone new to audio editing, and many of its more robust features will be unnecessary to anyone cutting a simple two-person interview.
Reaper is pretty affordable with a 60-day fully functional free trial and a personal license costs only $60.
A podcast production pipeline in action: Pushkin Industries
Producing a hit podcast isn’t just about great storytelling,it’s about delivering polished episodes on time, every time. For Pushkin Industries, that means coordinating distributed teams, managing large audio files and keeping production moving across tight deadlines without missing a beat.
Remote production, real challenges
As Pushkin scaled, sharing large audio files became a growing bottleneck. Google Drive and sync tools technically worked, but in practice introduced friction everywhere: slow uploads, broken syncs, missing files and endless waiting. Engineers often left machines running overnight just to move sessions, and problems tended to surface right before deadlines.
Rolled out first as a pilot on Against the Rules, LucidLink quickly proved its value. Instead of downloading and re-uploading files, the team could access everything instantly from a shared cloud workspace, eliminating sync issues and version confusion.
Smooth workflows, happy teams
LucidLink made it easy for producers, engineers and freelancers to collaborate in real time, no matter where they were based. Teams could open and play files immediately, move between tools like Descript and Pro Tools without friction and onboard contributors without complex setup.
Even though Pushkin focuses on audio, their production pipeline faces many of the same challenges as high-end media workflows: large files, distributed teams and constant iteration. With a cloud-native approach, everyone works from the same source of truth, with built-in protection against lost or overwritten work.
“LucidLink really improved our workflow and saved us a lot of time — which used to be one of my nightmares.” Constanza Gallardo, EP and Head of Production
Key takeaways for your podcast production pipeline:
Centralize all media in a single shared workspace
Eliminate downloads and re-uploads wherever possible
Make onboarding simple for collaborators and freelancers
Reduce reliance on sync tools and local storage
Keep workflows intuitive so teams can stay focused on the work
The outcome: a fast, reliable podcast production pipeline that scales with output and keeps teams focused on storytelling, not file management. By moving to a cloud-first workflow, Pushkin delivers high-quality shows on deadline, without the usual stress of file handling.
How LucidLink helps streamline your podcast editing workflow
Ready to take your podcast game up a notch with regular episodes and multi-series magic? Then you’ll want a collaboration platform that won’t slow you down.
LucidLink is an ideal solution for collaborative creative projects because it solves many of the common pain points podcasters encounter:
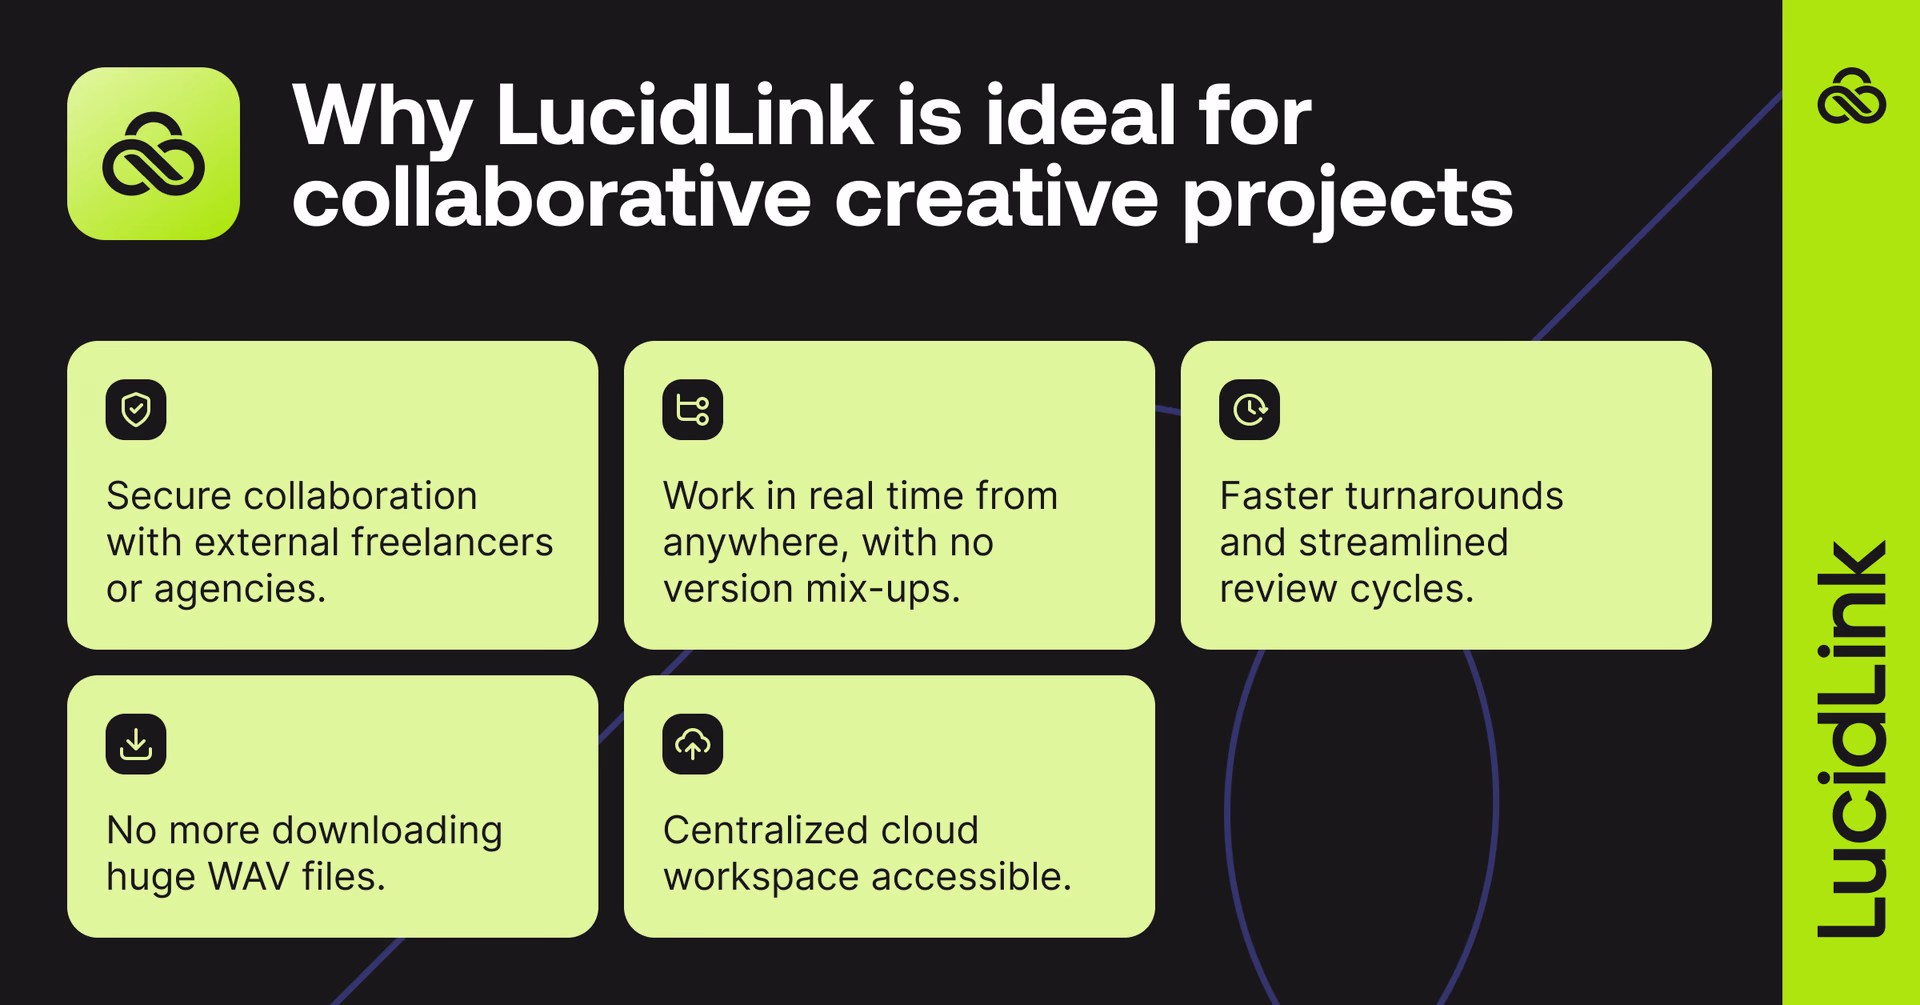
No more downloading huge WAV files or relinking missing assets: get to work without delay by accessing all your media on our global storage network.
A centralized cloud workspace accessible to hosts, editors and producers: use a single source of truth for source media, project files and final edits.
Work in real time from anywhere, with no version mix-ups: deliver on time from home or the office with 24/7 online access.
Secure collaboration with external freelancers or agencies: bring in more firepower when you need it thanks to fast onboarding and bulletproof security.
Faster turnarounds and streamlined review cycles: hit release dates sooner, even when a last-minute VIP guest joins your lineup.

Podcast post-production checklist
TLDR? Here’s the least you need to know before you go:
Organize files before you edit
Clean, cut, polish and mix your dialogue and music
Use fade-ins/fade-outs for a smooth listening experience
Keep audio levels consistent (aim for -16 to -14 LUFS)
Backup your raw media and final files
Export the correct file spec and publish
FAQs
Editing elevates your raw recording into a structured story a listener can enjoy. It’s what helps you chip away the rough parts and reveal the good stuff.
Keep reading

Creative production
Collaboration
How to send videos without losing quality: 3 best ways
Learn how to send videos without losing quality with these three easy methods. Discover the best tools for fast, high-quality video collaboration.
15 July 2026, 6 mins read

Collaboration
6 best collaboration software tools for architects in 2026
Discover the best collaboration software for architects in 2026, including BIM, CAD, cloud storage and remote workflow tools for architecture firms.
13 July 2026, 7 mins read

Collaboration
Cloud storage
The best Egnyte alternative for large files and collaboration
Discover the best Egnyte alternative for large files: streamline collaboration, get faster access and simplify hybrid workflows with LucidLink.
03 July 2026, 6 mins read
Join our newsletter
Get all our latest news and creative tips
Want the details? Read our privacy policy. Not loving our emails?
Unsubscribe anytime or drop us a note at support@lucidlink.com.